Building a Coaxial Airgun
Sprinkler valve airguns are powerful and easy to build, but are limited in how much pressure they can take due to their plastic construction. To make the next step in power, you will probably want to make a valve of your own. One of the easiest to construct is a piston valve. This particular type is a coaxial setup, one where the air chamber surrounds the barrel. This design is easy to construct and quite powerful for its size. It is also quite easy to drop into a stock for a nice looking airgun.
**Update**
Since coaxials are so simple and compact, they also make fine air pistols. Check out my blog for a detailed air pistol build.

Look at the picture above. The larger "barrel" is made from 3/4" type L copper pipe. This is the air chamber. Looking at the left, you see the smaller barrel, which is made from 1/2" type L copper pipe. Wait to do any soldering, you'll want to dry fit everything to make sure you have the correct fit. The two pipes are joined by taking a 3/4" -> 1/2" reducer and filing out the stop to allow the inner pipe to slide all the way through. Slide the barrel to go into the air chamber, leaving enough room for the piston plus 1/4" extra space for the piston to move backward. The piston side of the air chamber has a 3/4" female thread adaptor to allow easy service of the piston and attachment of the fill and/or trigger valve.
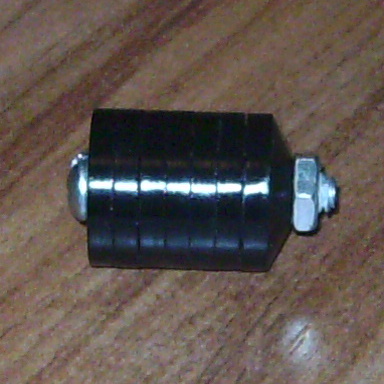
Now we need to build the piston. The easiest piston I've ever built is made from a stack of 1/2" L faucet washers on a 1.25" screw and secured with a nut. To ensure a good seal, the screw needs to be thick enough to have to thread on each washer. Also, use a bit of superglue around the head of the screw and the first washer. Once you get done adding the washers, lock them in place with a nut. Use a bit of superglue or thread lock on the threads to keep it in place. Here's what it should look like when you are done:
Now we are ready to make the filling/firing assembly. The one in the picture above uses a 3/4"->1/2" bushing, 1/2"->1/4" bushing, and a 1/4" T fitting. The trigger is a blowgun and the fill valve is a ball valve. You could also use a schrader valve if you use a hand pump. I used a quick disconnect to hook it to my homemade compressor. Hot glue a bit of high pressure hose in the 3/4" bushing to serve as a bumper for the piston and reduce pilot valve volume. Slide the piston in, seating it against the barrel. Next, thread the fill/trigger assembly on.
Take a dowel rod and push it through the barrel until it lightly rests on the piston. Adjust the barrel within the air chamber until you can push the dowel rod 1/4", unseating the piston and pushing it against the bumper. Scratch a mark in the barrel showing where you need to have it in position for soldering. Now take everything apart and solder the copper pipe together. Set it aside to cool.
While everything cools, be sure you used thread tape on the trigger/fill assembly. Lightly lube your piston with some silicone grease you can find around the place you bought the washers. Pop the piston in, thread on your trigger/fill assembly, and you've built a nice coaxial airgun.
| Home |
| Blowguns |
| Forum |
| Homemade Airguns |
| Hunting with Airguns |
| Links |
| Photo Gallery |
| Airguns for Sale |
