Building Airgun Arrows
Introduction
One of the best things about our homemade airgun or .50 cal Crosman conversion is the ability to use many different types of ammunition. This article will show you how to build a arrow that will allow you to take deer-sized game with your airgun, further increasing its utility. Of course, you'll want to make sure that you comply with all applicable laws before using these arrows for deer hunting.
Materials & Tools Needed
It doesnt take much to build arrows for your airgun:
32" aluminum arrows
Razor Blades
Brightly colored yarn
Thread
Clear fingernail polish
Field points or mechanical broadheads
Hacksaw or Dremel w/ cutoff wheel
Construction
Use a Dremel or hacksaw to cut the arrow down to 16". Polish off any rough edges. It is important to cut your arrows down as uniformly as possible to give the best flight to the arrow.
I use a cutoff wheel or a sanding drum on my Dremel for the next part. One could probably make do with 80 grit sandpaper if they had to. Using the above mentioned tools, rough up 1" of the back end of the arrow. This will provide the bed for our stabilizing tail.
Take a roll of brightly colored yarn and cut off around 30 to 40 3" strips. They dont have to be exactly even, as the stabilizing tail will be trimmed at a later stage. Place them in a line and put the back end of the arrow over them. Spread them evenly around the shaft of the arrow. It is important to have enough yarn back there, as it also provides a somewhat airtight seal, forcing the arrow out of your gun. Use some thread to secure the yarn to the arrow.
Coat the threads with clear fingernail polish and allow the assembly to dry completely. Once the cement has dried, use a razor blade to trim the slop on the arrow side of the stabilizing tail. Cut the tail to about 1 1/2" to 2" long, making sure that the cut is even on all sides. Your arrow is almost ready to test.
Shooting the arrow
For your first test, I recommend using a 80 to 100 grain field point. Make sure that you have a safe target and backstop, as these arrows have deadly penetration. These things are definitely not toys! Load your arrow in the gun, aim, and fire. Note the flight of the arrow. It will probably take some trimming to get its flight perfect. If your velocity is low, you might have to add more yarn to the stabilizing tail to create a better seal.
Using Mechanical Broadheads
Mechanical Broadheads have blades that fold forward and are held in place by a small o-ring. On impact, the blades are driven rearward, allowing them to cut a large blood channel. These can be adapted to work with our airguns. Look for ones that look to be around 1/2" in diameter when closed. These usually weigh in between 85 and 100 grains. With the blades in the forward position, try to load it in your barrel. Dont force it, if it doesnt fit, use a grinding attachment to trim it to size. Once the broadhead slides easily through the barrel, you are now prepared to hunt much larger game than most people thing is possible with an airgun. Imagine hunting with one of these arrows propelled at 250 to 300 fps! That's about par with low end crossbows!
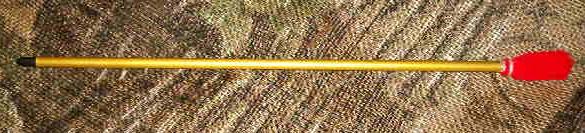
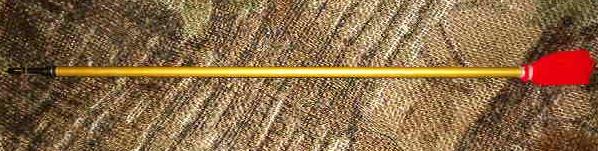
The Completed Arrow:
Field Point:
Closed Broadhead:
| Home |
| Blowguns |
| Crosman Mods |
| Forum |
| Homemade Airguns |
| Hunting with Airguns |
| Links |
| Photo Gallery |
| Airguns for Sale |
