High Volume 13xx Walkthrough
Special Thanks
The following article is republished by permission of Skyler McConahy. It contains an excellent walkthrough on increasing your 13xx valve's volume to achieve 700+ fps through the stock barrel.
Introduction
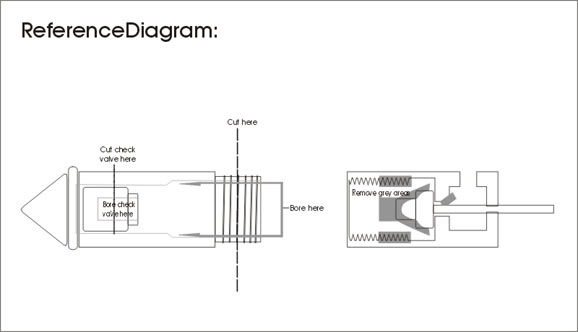
Before attempting any of these modifications, be aware that the final product will require heavy pumping, due to a much larger valve capacity. Beyond that, your velocities at the manufacturer's reccomended number of pump strokes may be up to 20% lower, due to the lower pressures created per stroke associated with having more volume. These mods are for the people who don't mind pumping 50 times to get off one shot. In other words, all the hunters and power freaks out there (you know who you are). The gun these mods were applied to shot at 545 fps stock with Beeman lasers. It now does 703 with the same pellets, and may be able to do more. I just can't bring myself to pump it that high. Anywys, all of my mods are included in this walkthrough. Also included is a reference diagram of the process to make things easier.
Part 1, Valve Volume:
To get right to the point, more air and more flow, equates into more power. Therefore, the more volume in our valve, and the more efficiently we can get rid of it, the more power potential we have. These are a few mods that will bring you much more air volume per shot:
1. Check valve.
The stock check valve is pretty short on the newer valves, but we are trying to cram as much air as possible into this valve, so lets take another 1/8-1/4" off, and bore a 1/4 hole halfway into the valve's inner surface (be careful not to press too hard, as you may melt your valve or drill all the way through it). DO NOT MESS WITH THE SEALING SURFACE! Then take a dremel and a large cone shape grinding stone, and bevel the edges of the hole (this will aid in airflow, and also give you a bit more volume). Clean up all the rough spots with a polishing attachment, and set it aside. Your check valve is now complete.
2. Valve stem.
Now we are going to shorten the valve stem. Cut HALF (and only half) of the first step off (where the spring rides) with a cutoff wheel. Be careful...There's steel in there, he he he. Grind the new inner surface to an approximate 90 degree angle and set the stem aside. We'll come back to it later.
3. Valve body.
The male (front) half of the valve casing has little to offer in diameter boring, but if you're brave, have at it. I did. Just make sure to leave enough of the stock ID for the check valve to ride flush in. If you are good, you may add a grand total of 1/64" of ID. A better (and safer) aproach is to just cut off half of the male threads. Don't take off too much, as it will make the valve more suceptible to leaks.
Now that we have half the male threads gone, we can get rid of the inner half of the female threads. This is easily accomplished with a small drum grinder bit, just don't take too much, and be sure not to touch the outer threads that will be engaging the male half of the valve (count how many males thread syou have left, then take off everything inside of that). After these mods, I recommend switching to a urethane O-ring seal.
4. Valve spring.
Though this is also an efficiency mod, if done with volume in mind, we can clear a bit of space by changing to a new spring with A. a thinner wire gauge, and B. a longer spring pitch, and C. a smaller OD. This all equates into a lighter valve spring that takes up less space, and the lighter the better. Just make sure it has enough tension to hold the valve shut. Also remember that the new check valve is shorter, so a longer spring may be in order.
Part 2, Valve efficiency:
Since our valve spring is already ultra-light, it should open in a flash, and stay open continuously through the firing cycle if enough force hits the stem. The stock hammer spring should be fine if you don't plan on pumping past 25, But to prevent airlock, allow the dumping of more air, and to allow a faster discharge in general, we will probably want to put in a stronger hammer spring. A good one for this job is the stock hammer spring from the 760 Pumpmaster. Fits nice and hits hard. The hammer could always be a bit heftier too, so take a single .25 lead or steel shot (depending on how high you plan on pumping), and use is as a spring pre-load/hammer weight, by placing it in the hole before installing the spring...or leave it out if you don't need the extra "umph."
As far as the valve casing, we will only be messing with the back half. It's best to leave the intake port alone, as any boring to produce better airflow will create extra headspace and actlly reduce the pump's effeciency.
1. Valve stem.
Take the shortened valve stem and chuck it in the Dremel. Turn it up to about 15,000 rpms, and SLOWLY take material off of the inner step with a small stone until it is a nice gradually rounded cone shape. The smoother the better. Think aerodynamic. Now do the same to the step that the spring rides on, but be careful and stay away from the sealing surface of the stem.
2. Exhaust port angle and valve-to-barrel mods.
The 90 degree angle leading into the rear exhaust chamber can be improved to about 45 degrees, but don't take too much out, and stay away from the inner sealing surface. Boring the port out to 1/4" and shoving some tubing in it is the popular way to do this, but this can cause unneccesary 90 degree turns that create excess turbulence, and can actually hurt the overall efficiency of the valve. Plus boring out the transfer port then bottlenecking it with tubing causes the formation of a premature expansion chamber, which causes yet more turbulence. I take a different approach on my transfer ports...
I bore the exhaust port out only to 3/16 if it needs it (some valve's ports are already at that ID...Gotta love Crosman QC, he he he), which is plenty enough port for a valve this small, then I use some hard-style automotive vacuum hose with a 1/4" OD, and a 3/16" ID and flush it up in place of the stock seal. I then cut it to appropriate length (about 1/32" longer than the stock steel transfer port including the seal), and shove it onto a small cone dremel attachment, and spin it up. I then turn the top 1/8 down to the ID of the barrel port. The snugger the fit, the better. If all your surfaces were clean, you should have a perfect seal. All that is left now is an aftermarket bolt probe to get a nice expansion chamber and deeper pellet seating. You should now have optimum air-flow effeciency, and your gun should be able to shoot at well over 650 fps with the stock barrel...700+ if you did everything just right, he he he. Much better than the stock readings of 540. All that's left after that are accuracy mods, which are quite simple...
Part three, Accuracy
I'll make this part brief, since most guns can easily outshoot their owners in stock trim. These mods just make things a little bit easier.
1. Polish all sear to hammer and sear to trigger contact points. Don't take off anything, just polish.
2. Install a lighter sear spring (preferably one with a guide).
3. Recrown the muzzle.
4. Replace the front tube plug/front sight with the barrel band from the 760 or 2289. A secure barrel is an accurate barrel.
5. Install a nice scope. Your pistol will suprise you. I can consistantly shatter clay targets from 65 yards with my 10" barrel, a 4x32, and a bit of holdover.
6. As a final touch, a trigger shoe will give your finger a bit more meat to work with.
Beyond all that, bear in mind that no two Crosman barrels are created equal. Check your rifling and get a new barrel if neccesary.
If this document helps even one man to feed his addiction, then my job here is done, lol. Peace out.
Again, many thanks for Skyler's contribution to this site!
| Home |
| Blowguns |
| Crosman Mods |
| Forum |
| Homemade Airguns |
| Hunting with Airguns |
| Links |
| Photo Gallery |
| Airguns for Sale |
